
Give dated melamine European cupboard doors a fresh look with this easy, budget-friendly painted cabinets before & after idea. It’s simple, affordable, and transforms the kitchen.
Would you like to update your kitchen cabinets without tearing everything out? You don’t have to replace cabinets to get a dramatic new look. This painted cabinets makeover refreshed an entire kitchen in our previous home using a few simple steps and minimal expense.
Below I’ll share the step-by-step process we used to update European-style melamine cupboard doors, plus practical tips to make the job easier and long-lasting.
Why I wanted a painted cabinets before & after makeover
The cupboards in this kitchen were described to me as “European style.” They weren’t poorly made—in fact, they were some of the nicest doors I’d ever had—but a few things bothered me:
- There were no knobs or pulls, so opening doors and drawers often resulted in broken fingernails or the wooden trim coming loose.
- I didn’t like the stained wood finish. The look felt dated and didn’t suit the rest of the house.
Television makeovers often remove and replace cabinets, but that wasn’t an option for us. Instead we chose an economical route: keep the cabinet boxes and update the visible door surfaces by painting the stained rails to match the melamine panels and add hardware.
How to update European cupboard doors — painted cabinets before & after
1. Remove the doors from the hinges
These European-style doors have durable hinges. To remove a door, simply loosen the two hinge screws and the door will slide off. Set doors on a flat surface for painting to reduce bending and make the work more comfortable.
2. Protect the melamine panels with painter’s tape
We only painted the stained wood rail, since the melamine panels were in good shape and color. Mask the melamine edges carefully with painter’s tape so you get crisp lines and protect the finish you’re keeping.
I didn’t remove drawer fronts. Pulling the drawers out and painting the faces while they were in place made the job faster and easier.
3. Apply two coats of stain-blocking primer
Use a primer that prevents stains from bleeding through. I used an oil-based primer I already had, but modern latex primers can also perform very well—ask your paint supplier for a stain-blocking recommendation. Apply two thin, even coats and allow full drying time between coats.
Tip: If you use oil-based products, consider inexpensive disposable brushes you can discard when the job is done. Clean-up for oil-based paint can be difficult, so reserve a quality brush for water-based paints that you’ll maintain and reuse.
4. Paint two coats to match the melamine finish
Have the paint color matched to the melamine if needed. We used a light, neutral semi-gloss to blend smoothly with the existing panels. Apply two coats, allowing sufficient dry time between each coat for the best finish and durability.
5. Remove painter’s tape carefully
Important tip: When removing painter’s tape, run a craft knife or x-acto blade lightly along the painted edge before pulling the tape. This prevents the paint from lifting and leaves a crisp, clean edge.
6. Install knobs and pulls
Adding hardware not only improves function but also completes the look. We found a stash of affordable knobs and pulls at a garage sale; drilling and installing them transformed how the cabinets felt to use and gave the kitchen a finished appearance.
Before and after: the reveal
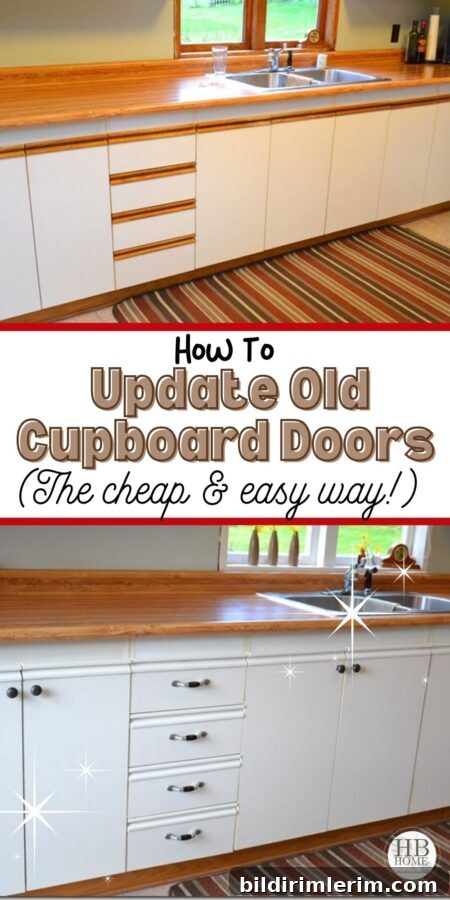
Here’s how the cupboards looked before the makeover:
And here they are after a simple painted-cabinets update—cleaner, brighter, and more cohesive with the room:
I even painted the window trim with the same paint and method while I was at it—sometimes a few small updates combine to make a big difference.
Other budget-friendly DIY ideas for a kitchen remodel
If you’re renovating on a budget, small projects add up. Here are related painting and upcycling ideas that work well in a kitchen:
- How to paint a room and recommended painting supplies
- How to paint metal doors with plastic trim
- Painted farmhouse table makeovers
- Painting an electric fireplace with chalk paint
- Quick painted lamp transformations
- DIY painted farmhouse corbels
- Painted dresser and furniture makeovers
- Painting old windows with chalk paint
- How to paint a bookcase with cottage-style paint
Want to tackle a room makeover but don’t know where to start? I created a free room makeover course to walk you through planning and executing projects like this painted cabinet update. Sign up on the site to access the course materials and step-by-step guidance.
This post was originally written in April 2011 and updated March 2022.