Using an Inspiration Photo to Remodel Our Master Bedroom
I often rely on inspiration photos when planning decor projects. Yesterday I began sharing how I turn those images into a real-life room. Here’s a clearer recap of that process and how our Master Bedroom changed as a result.
To start, this is the room I was working with — our Master Bedroom:
Before making any decisions I answered the four key questions I mentioned earlier about who uses the room, how it should feel, what colors I wanted, and what budget I needed to follow. With those answers in mind I pulled my favorite decor magazines and Pinterest boards to find a photo that captured the mood I wanted. I settled on this image as my inspiration:
Source: beachcottagelove.blogspot.com via Rita on Pinterest
I searched extensively for the original source of that photo; if you know where it came from, I’d love to hear.
From the moment I saw it, I knew that soft, breezy coastal feeling was what I wanted for our space. I studied the image carefully and noted several key elements that created its relaxed atmosphere:
- The dominant palette was neutral white — walls, curtains, and bedding — which formed roughly three-quarters of the room’s color scheme and gave a calm, airy foundation.
- Accents of aqua and blue in varying shades broke up the white and added freshness without overwhelming the space.
- Mismatched bedside tables contributed a casual, collected-over-time charm that felt welcoming and lived-in rather than overly staged.
- A small green accent on one nightstand introduced a touch of natural life, balancing the blues and whites and preventing the look from feeling too monochrome.
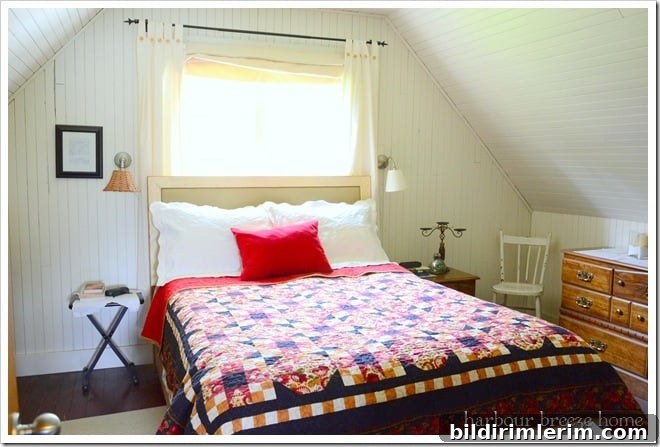
Working with items I already owned, I set out to recreate that same relaxed, beachy feeling. I focused on editing and repurposing rather than buying new pieces: switching linens, moving small decor accents, repainting a nightstand, and layering textiles to add warmth and texture.
Here’s the result of that effort — the finished room:
I won’t repeat every step here since I’ve covered many of them in previous posts, but I’ll summarize the main tactics I used so you can apply them at home:
- Use a predominantly neutral base — white or off-white walls, bedding, and curtains — to create a light, open canvas.
- Add two or three accent colors in small doses (pillows, throws, a lamp, or art) to introduce depth and personality without cluttering the palette.
- Mix and match furniture styles and finishes for a relaxed, curated look rather than a perfectly matched set.
- Include one living element (a plant or fresh flowers) to bring in color and texture naturally.
- Repurpose what you already own: paint an existing nightstand, rearrange bedding, or remake pillows from curtain fabric to achieve a cohesive look on a small budget.
If you missed the individual tutorials and reveal the first time, here are the original posts that go into detail about each element of the makeover:
Beach Cottage Bedroom ~ The Reveal
Aqua and White Nightstand
The {Accidental} Pottery Barn Knock-off Headboard
Simple Linen Pillow Tutorial
Turn a Grommet Curtain into a Throw Pillow
Envelope Pillow Tutorial
It might feel ironic that my “unique” decor began by copying a photo, but that’s a practical way to define the mood and then make it your own. The inspiration photo sets the tone; your personal touches — color choices, repurposed pieces, and small handmade details — transform the room into something original.
If budget is a concern, don’t be discouraged. Our Beach Cottage Bedroom makeover cost only $6.00 because most of the transformation came from editing and repurposing items we already owned. A thoughtful edit, a fresh coat of paint, a new pillow cover made from existing fabric — these small changes add up and can make a dramatic difference without a big expense.
{For a list of all the topics in the “31 Days to Make Home Uniquely You” series, click here.}
Shh…that’s my little secret: start with a photo you love, then give it your own spin. The result will feel both inspired and unmistakably yours.