Yesterday I shared a step-by-step tutorial for making chalkboard-style wooden ornaments. While we’re still on that topic, I wanted to share a few more ideas for handmade wooden ornaments you can cut from 1/4-inch Baltic birch plywood with a scroll saw. These simple, creative projects are perfect for DIY Christmas decorations, gifts, or craft fairs.
Both ornament ideas start with the same basic process: trace or transfer a pattern onto 1/4″ Baltic birch, cut it carefully with a scroll saw, sand the edges smooth, then paint and finish. Below are two decorative options—one quick and graphic, the other layered and detailed—that you can adapt to your own holiday color palette and style.
Wooden Ornament 1: Stenciled Design
This stenciled ornament is a great option if you prefer a fast, polished look without hand-lettering. After cutting the base shape from plywood and sanding the edges, paint the background color—black and white gives a popular chalkboard feel, but you can choose any colors to match your décor. Place a small stencil (a floral motif, star, or snowflake all work well) and apply a thin layer of paint with a stencil brush or sponge.
For a subtle accent, add a metallic gold or silver dot in the center of the stencil design, or highlight small details with a fine brush. Because these ornaments are quick to stencil, they’re ideal for making multiple coordinating pieces for a tree, garland, or packaged sets for gifts. Change the color scheme to match a room, holiday theme, or a custom palette—red and green for traditional Christmas, pastels for a modern take, or neutral tones for a rustic look.
Wooden Ornament 2: Snowman Scene
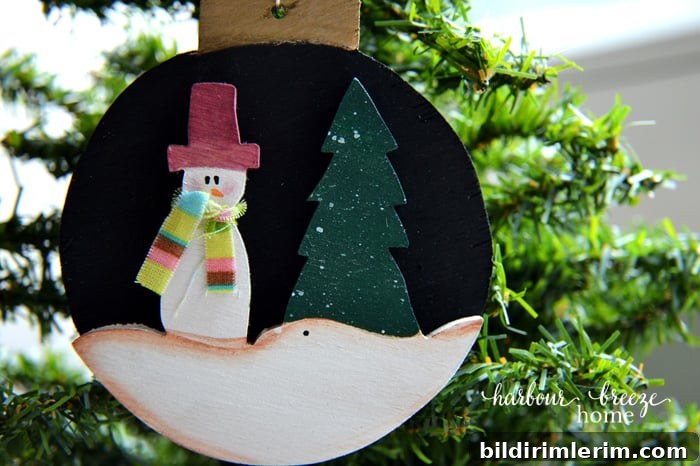
The layered snowman scene takes a bit more time but yields a charming, three-dimensional ornament. Cut two layers from the plywood—the front layer with the snowman silhouette and the back layer as the base. Paint each layer separately, allowing details to dry before adding accents. Glue the layers together and add a small loop of twine or ribbon for hanging.
I like to add tiny fabric strips as scarves for texture and personality. For painted snowfall, try an easy splatter technique: dip an old toothbrush into white acrylic paint, wipe off excess, then hold it over the ornament and run your thumb along the bristles to scatter fine droplets of paint. This creates natural-looking falling snow and works well on dark backgrounds.
Finishing tips: seal your painted ornaments with a clear matte spray or a thin layer of decoupage medium to protect paint and give a uniform finish. If you prefer a vintage look, lightly sand edges and surfaces after painting to reveal some of the wood grain. For hanging, choose jute twine for a rustic vibe or metallic ribbon for a more festive, polished look.
This post is part of the 12 Days of Handmade Christmas ideas series, where a variety of quick and budget-friendly holiday projects are shared—everything from paper star ornaments to painted antler signs, decorative bulbs, and festive recipes. These wooden ornament techniques fit well into that collection as easy, customizable projects for crafters at any skill level.
Now it’s your turn—are you working on any handmade Christmas projects this season? I’d love to hear about your ornament ideas, color choices, or finishing techniques. Share your thoughts in the comments below or on the Facebook page. Happy handmaking!