DIY Washer Necklace: Metal Stamping and Simple Techniques
Create personalized, handmade jewelry by learning how to metal stamp and customize a washer necklace. This accessible craft produces charming, rustic pendants that make thoughtful gifts and stylish accessories. Below you’ll find an easy-to-follow overview of materials, methods, and tips to get started on your own washer necklace project.
My introduction to washer necklaces came from a friend during a visit to Nebraska. While I was there I picked up a set of steel letter stamps—an exciting find that led to an awkward moment at airport security. That little story aside, metal stamping on washers is straightforward and very satisfying once you get the hang of it.
Materials You’ll Need
- Steel letter and number stamps (alphabet set)
- Metal washers (various sizes—stainless steel or brass work well)
- Ball-peen hammer or metal stamp hammer
- Solid surface or bench block for stamping
- Permanent marker or dark rubbing solution to enhance stamped letters
- Alcohol inks or metal patina for adding color to smaller washers (optional)
- Wire, seed beads, and pliers for wrapping and embellishing (optional)
- Hemp cord, ribbon, chain, or leather cord to finish the necklace
- Clear sealant or lacquer (optional, for protecting ink or patina)
Basic Steps: From Blank Washer to Finished Pendant
1. Prepare your workspace. Place a sturdy metal bench block or anvil on a solid surface. Make sure the area is well-lit and stable—accurate stamping needs a firm base.
2. Plan your design. Decide on a word, name, date, or short phrase to stamp into the washer. Smaller washers are ideal for single initials or short words; larger washers allow for more characters. Use a permanent marker or a pencil to lightly mark letter placement if desired.
3. Secure the washer. Position the washer on the bench block. You can mask around the area with low-tack tape to help keep the washer steady and to guide letter spacing.
4. Stamp the letters. Hold the stamp vertically and strike the top of the stamp firmly and squarely with the hammer. It’s usually best to give a solid, controlled hit rather than multiple light taps. Check the impression; if it’s too shallow, you can re-align and stamp again, but be careful—overlapping impressions can blur the letters.
5. Darken the impression. Rub a permanent marker or an oxidizing solution across the stamped area, then wipe the surface clean so the ink remains in the indented letters. This step improves readability and gives the pendant a finished look.
Coloring, Wrapping, and Finishing
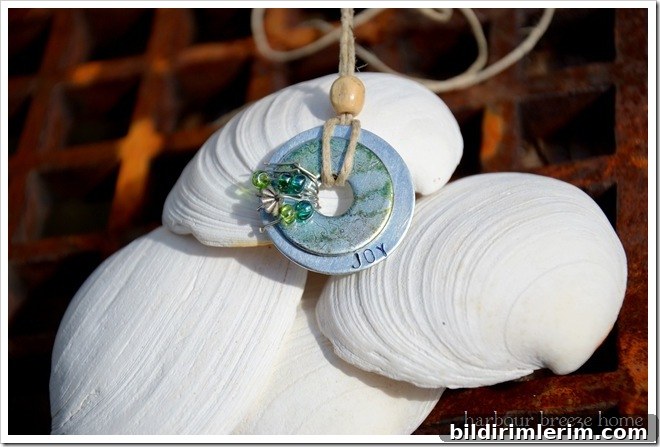
For a layered or vintage aesthetic, consider adding a smaller colored washer behind the stamped piece. Alcohol inks are an easy way to apply translucent color to metal washers—apply the ink, let it dry, and seal if you want more durability. Another option is to use a contrasting metal like brass or copper beneath a stainless steel stamped washer.
Wire wrapping and small seed beads add texture and personality. Wrap craft wire through the washer hole and around the smaller washer, incorporating a few beads for accent. This also helps secure multiple layers together and creates an attractive focal point.
As for the necklace itself, hemp cord gives a natural, artisan vibe; ribbon or leather cord creates a softer or more refined look; and a delicate chain lends a more polished finish. Choose the closure and length that best suits your style or the person you’re making the gift for.
Troubleshooting and Helpful Tips
- Practice on scrap washers or coins to get a feel for how hard to strike with the hammer.
- Keep stamped characters evenly spaced by marking positions lightly beforehand.
- Use tape to steady small pieces while you work to prevent slipping.
- If letters are faint, reposition and re-stamp carefully, watching alignment.
- Seal colored finishes with a clear coat to protect them from wear and moisture.
Variations and Ideas
Washer necklaces are highly customizable. Try stamping inspirational words, dates, coordinates, initials, or short quotes. Mix metals, layer washers of different sizes, add charms, or incorporate recycled materials for a personalized touch. These necklaces make economical craft fair items, meaningful gifts for friends and family, or a fun project for a craft night.
If you enjoy combining techniques, look into tutorials on stamping, alcohol ink dying, and bead wrapping—each technique complements the others and opens up many creative possibilities. With a few basic tools and a little practice, you can make unique, wearable pieces that showcase your personal style.
Note: This project involves metal tools and hammers—use appropriate eye protection and work in a safe, well-ventilated space.
Acknowledgement: I originally learned this technique from a friend and combined a few different methods—stamping, coloring, and wire wrapping—to create the finished washer necklace shown above.