DIY Homemade Chalk Paint: Easy Recipe and Window Makeover
Chalk paint has been a popular topic on DIY and decorating blogs for years, and I finally decided to try it for myself. People often praise chalk paint because it covers quickly and smoothly, usually without the need for priming. After researching commercial options — including well-known brands — I opted to try a simple, affordable homemade version.
Simple Chalk Paint Recipe
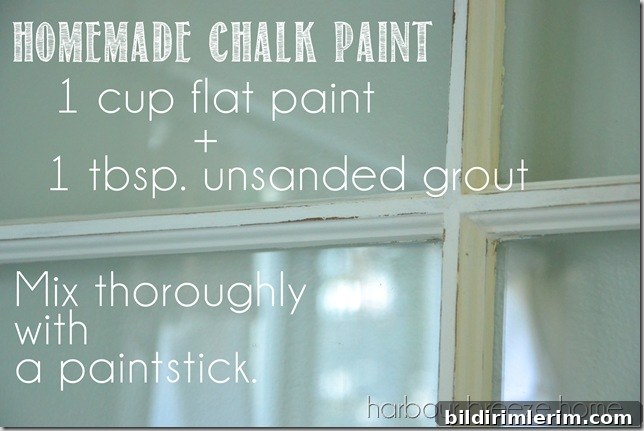
The recipe is straightforward and uses only two ingredients: 1 cup of flat paint and 1 tablespoon of unsanded grout. I mixed everything in a cottage cheese container and stirred until smooth. For this project I used pure white ceiling paint in a flat finish because I didn’t have flat latex on hand. The unsanded grout came from a local building supply; a small bag cost around $10 and will make many batches.
Project Overview: Window Pane Makeover
My project was an old window with many panes that I wanted to repurpose as bathroom decor. The most time-consuming part was taping paper over the glass and removing the hardware so the glass would stay clean and the paint would only cover the wood. Although it felt tedious while I was doing it, the careful prep paid off in a much cleaner result.
Applying the Chalk Paint
I brushed on the first coat and was immediately impressed by the thickness and coverage. Chalk paint feels much heavier than regular latex, which makes it easier to achieve an even finish without worrying about brush strokes. Because the old stain on the wood was fairly strong, a little of the underlying color did show through on the first coat. For this project that worked to my advantage, since I wanted a slightly antique-white look rather than stark white. After a second coat the color was exactly what I wanted.
Pro Tip: Clean Separation at the Glass
Before removing the tape, run an X-Acto knife or a utility blade carefully along the paint edge around each window pane. This small step prevents fresh paint from peeling off the wood when you pull the tape, giving you crisp, neat lines and preserving the painted surface.
Sanding and Distressing
After the final coat cured, I sanded the whole piece to give it that signature chalk-paint feel. Chalk paint tends to sand to a very soft, silky finish compared with regular latex. You can sand lightly just to highlight details, or sand more aggressively for a heavily distressed look. I chose a light touch to reveal the window’s architectural details without over-distressing.
Finishing and Hanging
Once the sanded finish was to my liking, we rehung the window above the tub as bathroom decor. Right now it looks a bit sparse, but I have additional ideas to layer accessories and accents on that wall to complete the vignette.
Tips and Considerations
- Use flat paint for the best consistency; ceiling paint in flat finish works fine in a pinch.
- Unsanded grout is the key additive — it gives the paint body and a chalky feel. A small bag goes a long way.
- Prep carefully: tape glass and remove hardware to avoid cleanup hassle.
- Cut the paint film with a blade before removing tape to prevent peeling.
- Sanding can be minimal or extensive depending on how distressed you want the piece to look.
- To protect the finished surface, consider a clear topcoat or wax designed for chalk-painted furniture and decor.
This homemade chalk paint process is inexpensive, forgiving, and ideal for creating vintage or shabby-chic finishes on wood decor. The fast coverage, easy sanding, and flexible distressing options make it a great choice for DIY projects like this window pane makeover.