
Lately I’ve been making batch after batch of blackberry jam and decorating a few jars to keep on hand as quick, thoughtful gifts. A jar of homemade jam is perfect for hostess gifts, teacher appreciation, or a small token for friends and neighbors. Before I tucked them into the cool storage area of the basement, I dressed up several jars with simple paper toppers and twine so they’re always ready to grab when I need a last-minute present.
Supplies Needed
- Cardstock paper in coordinating colors. Two contrasting colors look especially nice for a layered look.
- Scallop circle paper punch or any decorative punch for a second, smaller shape.
- Scissors or a craft knife and cutting mat for precise circles.
- Pen or fine-tipped marker for labeling.
- Fine-tipped art marker for neat hand-lettering and dates.
- Baker’s twine, ribbon, or thin jute for tying around the jar.
- Buttons, small wooden shapes, or a charm to glue into the center of the bow for a finished accent.
Step-by-step Instructions for Decorating Jam Jars with Paper
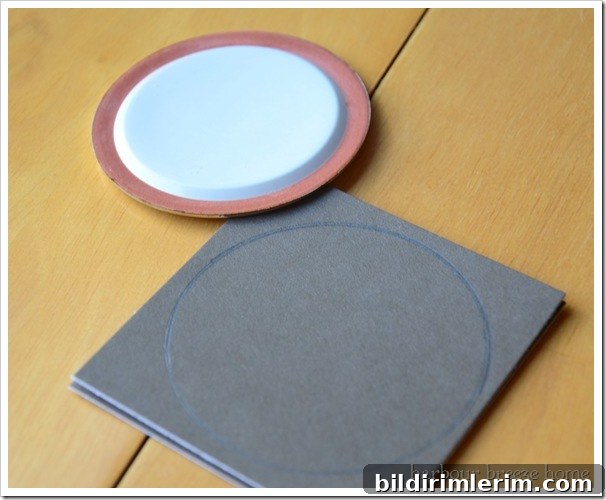
- Trace and cut the base circle: Place the metal ring from your jam jar lid on the cardstock and trace around it to create a circle the same diameter as the lid. Cut carefully with sharp scissors so the circle lies flat and smooth on the lid.
- Fit the paper to the lid: Unscrew the jar ring, place the cut cardstock circle on the metal lid, then re-screw the ring over the paper to secure it. Press evenly so the paper sits flat and taut against the glass lid.
- Add a decorative top layer: Use the scallop circle punch to cut a smaller, contrasting piece of cardstock. Hand-letter your message—flavor name, date, or a short note—on the scallop circle with a fine-tipped marker. Attach this layer to the center of the lid with a small dot of glue, a glue stick, or a rolled piece of double-sided tape for a clean, secure hold.
- Wrap and embellish: Wind baker’s twine or ribbon around the neck of the jar two to three times and tie a tidy bow. For extra charm, secure a small button, wooden bead, or decorative charm to the center of the bow with a dab of hot glue. This adds a handcrafted touch and helps keep the bow in place during handling and storage.
A small button glued to the bow makes the final flourish and gives each jar a polished, thoughtful appearance.
All set and ready to share—these decorated jam jars are convenient, personal, and lovely to give.
Tips and Variations
- Labeling: Include the jam flavor and the year on the scallop circle or on a small tag. Hand-lettering gives a warm, personal look; if you prefer neat consistency, print labels from your computer or use a label maker.
- Material alternatives: If you don’t have cardstock, consider lightweight fabric circles, doilies, or patterned scrapbook paper. For a rustic feel, use kraft paper and twine.
- Adhesives: For temporary decorations (if you want the jar to be easily reusable), use rolled double-sided tape or removable glue dots. For a permanent decorative finish, a glue gun or craft glue works well.
- Personalization: Add a short note on the underside of the lid topper—“Made with love” or “Enjoy!”—or include a tag with serving suggestions and storage tips.
- Presentation: Pair a jar of jam with a small loaf of bread, a block of cheese, or a wooden spreader to create a fuller gift package.
Other Handmade Gift Ideas
- Sew a fragrant lavender sachet for drawers or closets to complement edible gifts.
- Bake cookies or muffins and package them in a box or cellophane bag with a handmade gift tag for a delicious, personal present.