The other night I overheard a conversation that stuck with me: “To succeed in a creative field, you have to move beyond fear.” That idea resonated. Trying something original means stepping into the unknown and accepting the risk that the outcome might not be perfect. My recent DIY “sparkle” sign project is a good example of that lesson in action.
I imagined a quick, simple, and charming addition to my Handmade Christmas projects: a shiny, girly gift that would delight a teen or anyone who loves sparkly decor. I planned to use leftover house paint, thinking it would be an eco-friendly, budget-friendly way to create something beautiful. Spoiler: the plan didn’t go exactly as imagined, but it still turned out well in the end.
The first issue was drying time. House paint simply takes longer to cure than acrylic craft paint, and my timeline was tight. Even with a blow dryer speeding things along, the paint dried sluggishly. That’s a useful takeaway if you plan a similar DIY sparkle sign: acrylics will usually dry faster and let you move through steps sooner.
Next came a color problem. I intended to paint a perfect black stripe across the center, but the “black” house paint I grabbed turned out to be a deep brown in the can—panther brown, not black. With everything already painted, I switched to black acrylic for the stripe, which fixed the color issue but introduced another small complication: the surface under the lettering was still a little tacky.
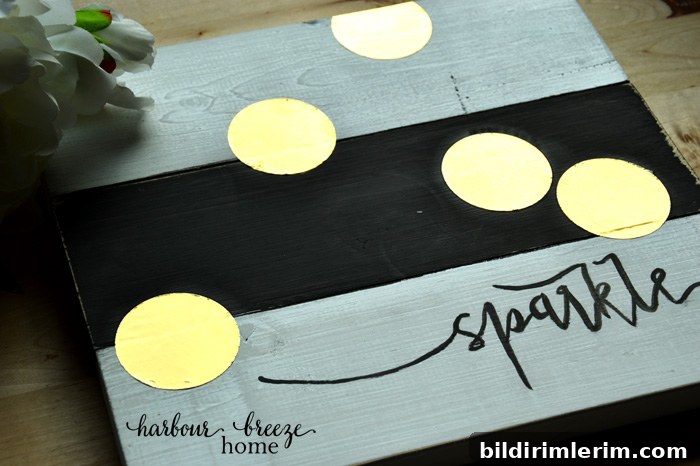
Undeterred, I transferred the word “sparkle” in a playful script (I used a modern calligraphy font I love) to the white corner of the sign. When I lifted the transfer, graphite smudges had marked the white paint. At that moment I could have scrapped the whole piece, but I decided to embrace the imperfection.
I pulled out sandpaper and gave the sign a light distressing, shifting the aesthetic from modern to weathered-chic. The sanding removed the smudges and added character—another important idea for anyone making a DIY sign: intentional distressing can turn mistakes into a style choice.
With the lettering painted on, I moved to the final flourish: metallic polka dots. I tried stenciling gold paint, but the finish was translucent and didn’t give the bold sparkle I wanted. Rather than force a look that wasn’t working, I switched strategies.
Out came my stash of metallic scrapbook paper. Using a large circle punch, I cut crisp gold disks and glued them over the stenciled areas with a thin layer of liquid glass adhesive. The metallic sheets gave the sign the reflective, high-impact sparkle I’d imagined and covered up the earlier stenciling mishap.
In the end, the sign became exactly what I wanted: a sparkly, feminine piece with a little handmade charm and a story behind it. The project taught several practical lessons for DIY crafters: choose the right type of paint for your timeline, test colors before committing, handle graphite transfers with care, and remember that sanding or switching materials can rescue a project.
If you’re looking for a handmade Christmas gift or a quick holiday craft, consider this approach: plan for acrylics if you need faster drying, test any transfer or stencil on scrap material first, and keep a backup plan like metallic paper or glitter embellishments. Creativity often requires stepping past fear and adapting as things go sideways—if you’re willing to pivot, the result can be even better than the original vision.
See all the 12 Days of Handmade Christmas Ideas here.