
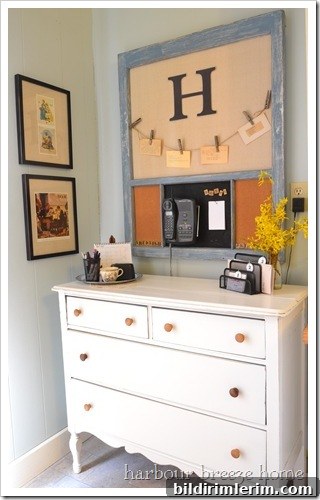
DIY Antique Window Wall Art: A Simple Handmade Home Decor Project
Handmade home decor brings character and a personal touch that store-bought items can’t match. Repurposing an old window into wall art or a decorative display is an affordable, creative way to add vintage charm to your home. I’ve long loved working with antique windows and have used them in several projects, from a kitchen message center to seasonal arrangements in my entryway. Below is an easy-to-follow guide to transform an old window into a custom piece of wall decor.
This old window once served as a kitchen message center and later as part of a fall entryway display. You can keep one side as a chalkboard, mount a painted panel behind the panes, or create dimensional artwork that fits your style. Below is a project I made with a feminine color palette in mind, but swapping colors and wording makes it suitable for any room.
Materials and Tools
- An antique or vintage window frame (cleaned and structurally sound)
- An MDF panel cut to fit the window opening (this thin 1/4-inch artist-grade panel is excellent for painting; a full 8′ x 4′ sheet is affordable and easy to cut)
- Cardboard dimensional elements or chipboard embellishments (scrapbooking supply stores carry a wide selection)
- Foam brushes and a few small paintbrushes for detail work
- Acrylic paints in your chosen color palette
- Mod Podge or a similar decoupage glue/sealer (not pictured)
Step-by-Step Instructions
Although I don’t have progress photos for this build, the process is straightforward and forgiving. Follow these steps to assemble your own decorative window panel:
- Prepare the window frame. Lightly sand the surface to remove loose finish and grime. If you suspect the paint is old, work outdoors to reduce exposure to any potential lead dust. You can leave some of the original patina to preserve character.
- Paint the MDF panel. Apply a base coat in the color of your choice using a foam brush for a smooth finish. Allow it to dry completely between coats.
- Color the dimensional elements. Paint your cardboard or chipboard shapes to coordinate with the background. Layer colors and allow each layer to dry.
- Attach the painted panel to the back of the window. Use small finishing nails, construction adhesive, or screws placed where they won’t be visible from the front—whatever method is most secure for the size and weight of your window.
- Glue the dimensional elements. Position your painted embellishments on the panel and adhere them with Mod Podge or a strong craft glue. Seal over the top with a thin coat of Mod Podge if you want extra durability and a slight sheen.
- Add hand-painted details. Use a small brush to paint fine lines, accents, or lettering on the dimensional pieces for depth and personality.
And that’s it — a custom, vintage-inspired window panel ready to hang. This is a simple and creative way to repurpose an old window and make a piece that reflects your taste and decor.
Finishing Tips and Style Ideas
Keep the aged finish visible in spots to maintain vintage appeal—light paint washes work well to soften the overall look without hiding the patina. For a polished versus shabby look, adjust paint colors and the amount of distressing. You can also add a small hook or hardware to the back for easy hanging or convert the piece into a message board by applying chalkboard paint to one panel.
If you enjoy seasonal decorating, these window panels are easy to swap out with new backgrounds and embellishments. They make thoughtful handmade gifts and can be scaled up or down depending on the window size. Have fun experimenting with color, texture, and layered elements to create a bespoke piece that complements your home.
{For more projects in the 31 Days series, see the original collection.}