
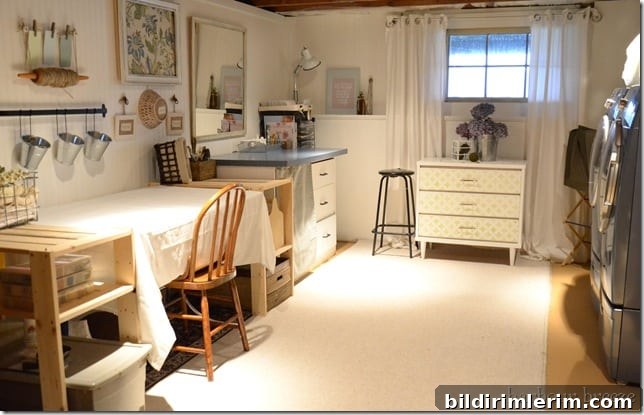
Turn an unfinished basement space into a basement craft room and laundry room in one.
I work better with a deadline. What started as a slow, take-your-time basement renovation suddenly accelerated when Kelly at Eclectically Vintage invited me to join their “Impossible Project” challenge. The deadline was today, and that urgency pushed me to complete most of the work quickly.
After agreeing to participate, I discovered I only had eight days at home to tackle the project—my husband and I were traveling for work. One of those days we lost power for 24 hours, and on several others I had limited time and energy. Despite the tight schedule and a few setbacks, the space is now functional and cheerful. A few finishing touches and organizational tasks remain, but the room already works beautifully as a combined craft room and laundry area.
My approach leaned heavily on recycling and repurposing items we already owned. That kept costs low and added personal character to the space. I used thrifted finds, reclaimed hardware, and inexpensive materials to create a bright, practical space that feels fresh without a large budget.
When we moved in, this area was unfinished and gloomy. With a few strategic changes—new paint, beadboard wallpaper, thrifted shelving, and a bit of creativity—the room now feels welcoming and usable.
During the renovation I focused on practical, visible improvements that would make the biggest impact quickly. I left the unfinished ceiling for a later phase since it does not affect daily function. Instead, I concentrated on the long wall, which became the project’s focal point. A Pottery Barn catalogue provided inspiration for layout and styling, but most elements were made from things we already owned or picked up inexpensively.
For example, I used antique rusty drawer pulls salvaged from older furniture; they add character and were simply hot-glued onto nails. Empty Ikea frames that had been sitting unfinished for years finally found a purpose on the wall. A sentimental rolling pin—one that belonged to my grandmother—became a decorative and functional jute holder, mounted using an old glass electrical insulator found in the garage.
I also printed a simple, cheerful piece of printable artwork discovered on Pinterest. It felt right for this light-hearted, creative area and seemed to sum up the room’s new personality. I plan to share future posts with step-by-step details for the wall treatments and a few DIY projects used in this makeover.
Costs were intentionally minimal. Here’s a clear breakdown so you can see how little it took to make a big difference:
- Beadboard wallpaper (on sale at Canadian Tire): $18.00
- Two sheets of drywall: $24.00
- Paint (including leftover for more projects): approx. $40.00 — Behr “Polar Bear” for walls and untinted semi-gloss white for furniture
- Thrift store shelf: $7.00
Total: $89.00
This makeover has been a gradual process over the past few years. If you’re interested in the full renovation history, there are posts documenting the basement before, organizing steps, lighting fixes, stenciling projects, painting, drywall installation, choosing colors, and window coverings. Those posts outline how each small project built toward this cohesive, budget-friendly craft and laundry space.
Thanks to Kelly and the Impossible Project challenge for the push to get this mostly finished. It’s rewarding to see the transformation—from a dull, unfinished basement to a bright, functional area that combines craft space with laundry utility. The room now invites creativity while handling the practical chores of everyday life.
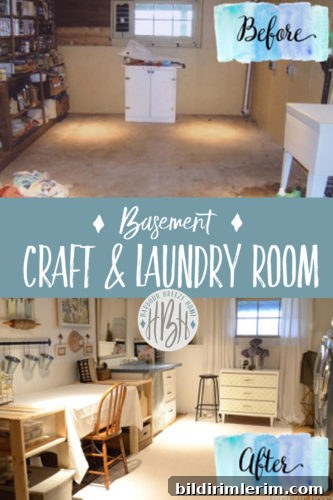
If you enjoy budget-friendly makeovers, I also tackled a small kitchen refresh for only $159 that uses the same principles: reuse, repurpose, and prioritize high-impact updates.

I’ll be sharing more detailed posts soon about the beadboard wall, stencil work, and other DIY treatments used in this space. For now, enjoy the before-and-after—sometimes a few thoughtful, low-cost changes are all you need to transform a room.