Can you paint over stained wood? Yes — and with the right steps you can transform old dark wood trim into crisp, modern trim. This guide shows an easy, reliable process for painting stained wood trim with dramatic results.
If you live in an older home, you’ve likely encountered decades of dark, varnished trim and paneling. Our previous house had 1970s-style dark paneling, varnished wallpaper, plywood walls, and cement floors. My painter brother-in-law once told me any surface can be painted if you use the right products and methods. Over many projects I’ve tested that theory—and it holds true.
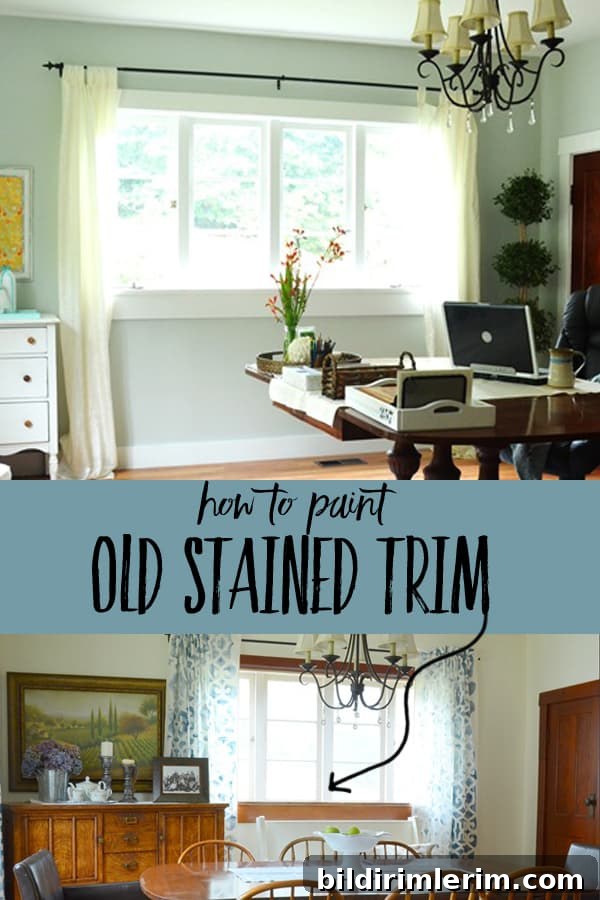
This particular trim is likely original to the house—probably fir boards from the 1920s—and it was deeply stained. I painted varnished board walls in the master bedroom first, then turned my attention to the stained trim in my son’s bedroom. The same basic steps work for window and door trim, baseboards, and other stained woodwork.
Disclosure: This post originally referenced product recommendations for convenience.
Materials and supplies for painting stained wood trim
- Oil-based primer (for example, an oil-based Kilz primer in spray can or can form)
- Latex paint in a semi-gloss finish
- Basic painting tools: angled sash brush, small trim brush, paint tray, stir stick, and drop cloths
- Painter’s tape and paper or magazine pages to protect glass and nearby surfaces
- TSP (trisodium phosphate) or a similar heavy-duty cleaner for degreasing
- Cleaning bucket, rags, and rubber gloves
Local paint stores are a great resource when choosing primers and paint. Talk to an experienced salesperson if you have questions about specific primers for very old or oily wood. Test any primer you plan to use on a small patch first when in doubt.
Step-by-step instructions: How to paint over stained wood trim
- Clean the surface thoroughly. Remove dirt, dust, and oily residue using a TSP-and-water solution. TSP is a strong cleaner that strips grease; it’s sold in hardware stores. Wear rubber gloves and rinse well. You’ll be surprised how dirty the water becomes—the cleaner the surface, the better the primer will adhere.
- Protect areas you don’t want painted. Use painter’s tape to mask window glass, hardware, and adjacent walls or flooring. Old magazine pages or plain paper work well to cover larger areas. If you plan to paint the walls later, you can be a bit less strict about primer overspray, but cover any surfaces you want to keep paint-free.
- Choose and apply the proper primer. This is the crucial step: use an oil-based primer to seal stained wood. Oil-based primers block stain bleed and prevent the oils and tannins in old wood from seeping through the finish coat. If you use a water-based primer, the underlying stain or wood oils may discolor your topcoat. Some high-performance latex primers (for example, certain Benjamin Moore products) can work on specific surfaces, but always test first. I used an oil-based Kilz primer in a spray can for this window trim because it sprays on smoothly and dries quickly.
- Apply primer in thin, even coats and follow label directions. Whether you spray or brush the primer, use light, even coats and allow adequate drying time between coats. When spraying near a window, work on a warm, sunny day and keep the window open to ventilate—but be careful not to spray the window shut. The primer’s job is to seal and create a stable surface for paint, not to fully color the trim.
- Finish with two coats of latex paint. Once the oil-based primer has fully cured, you can use latex (water-based) paint for the finish. Brush on two coats of semi-gloss latex paint for durability and easy cleaning. After the initial oil primer, latex paint adheres well and you won’t need to use oil-based products again on that surface.

Once the stained wood is sealed with an oil-based primer, future repainting is much simpler because you can use standard latex paints. I’ve used this method throughout our home and the transformation is dramatic—dark, dated trim becomes bright, clean, and modern.
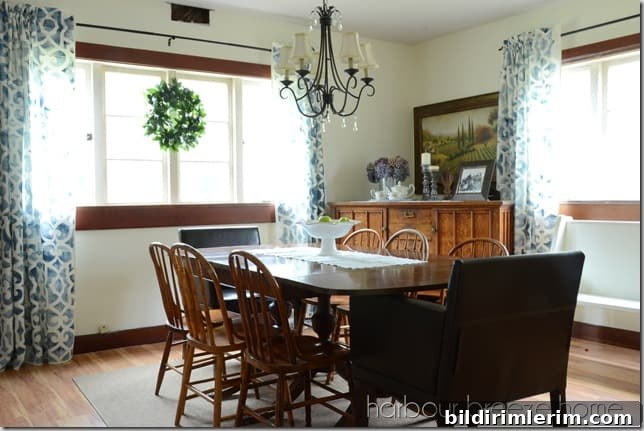
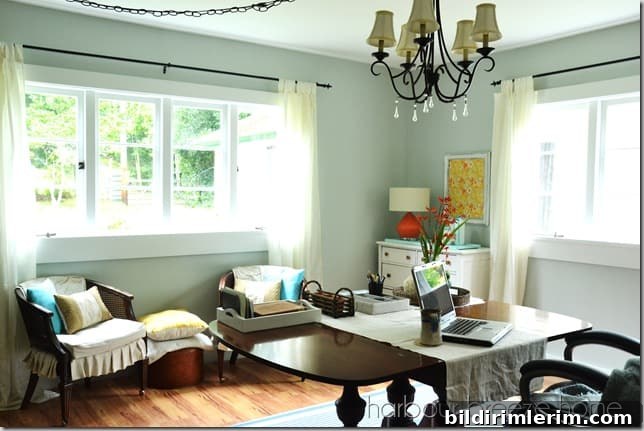
Here are before-and-after examples from our dining room to illustrate the difference paint can make:
Dining room before:
Dining room after (trim painted white):
Quick tips and troubleshooting
- If oil-based primer odors are a concern, ventilate well and choose a low-odor oil primer or use primer in well-ventilated spaces.
- Always test primers and paints on an inconspicuous area before committing to the whole project.
- For large amounts of priming, purchase primer in a paint can and roll or brush it on; aerosol cans are convenient for small trim but don’t cover large areas as efficiently.
- Allow primers and paints to dry fully between coats for the best finish and adhesion.
Painting old stained wood trim is a cost-effective way to update a room. With proper cleaning, the right oil-based primer, and two finish coats of latex paint, you can permanently change the look of dark, dated trim and enjoy a refreshed, brighter space.