Coastal Stump Side Table — A Simple DIY Makeover
We found our stump table years ago right on the beach. I needed an extra surface in the living room and, since this weathered chunk of wood was already sitting outside, it seemed like the simplest and most affordable option. The natural texture and coastal character fit our home immediately.
Because it had floated in the ocean, the wood took a long time to dry. I set the stump on a folded beach towel on the floor and rotated it every few months so the weight would distribute evenly. That practical, low-effort approach kept it from marking the floor while we used it as a casual side table.
Recently, while clearing out the dining room in preparation for a separate office makeover, we discovered a set of table legs we had bought for this stump years earlier. I had completely forgotten about them. It felt like a small, satisfying moment to finally finish something that had been waiting for completion.
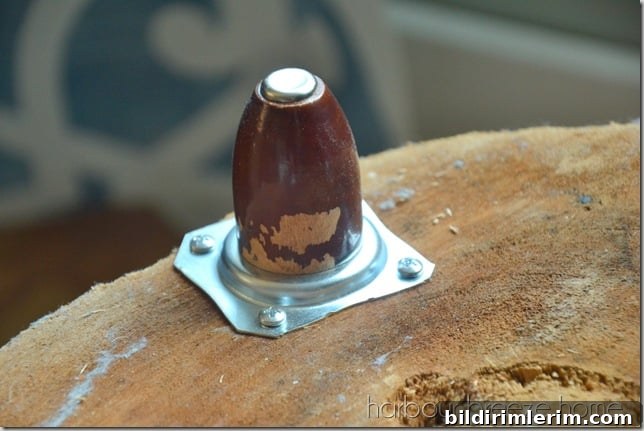
My husband grabbed the tools and attached the legs. The installation was quick and straightforward, and the table instantly looked more finished—like a proper piece of furniture rather than a found object. During the process, one of the legs was damaged, though, so we had to come up with a minor repair and a way to hide the imperfection.
At the same time I was experimenting with chalk paint on an electric fireplace, I decided to use the same paint on the table legs. Chalk paint works well for covering imperfections and gives a soft, matte finish that complements rustic, beachy wood. I applied several thin coats, allowing each to dry before adding the next so the coverage stayed even and smooth.
After a few coats of paint, the legs looked refreshed and uniform. The painted finish not only hid the damage but also created a visually pleasing contrast between the warm, natural stump and the lighter, more finished legs. Years after we first picked the wood up off the beach, the table finally felt complete.
I chose not to seal the stump with varnish. The raw, weathered surface is part of the table’s charm, and after years exposed to the elements it feels authentic and durable. For everyday use—holding a coffee cup or acting as a plant stand—the stump has been perfectly practical without a glossy finish. If you prefer extra protection, a clear sealer or oil could be applied, but I’m happy with the natural look.
Tips for Upcycling a Driftwood Stump Table
- Clean and dry the wood thoroughly before attaching hardware; salt and moisture can trap inside, so give it time to air out.
- Choose legs and hardware that complement the stump’s proportions—shorter legs keep the rustic look while taller legs make it more functional as a side table.
- If a leg is damaged, paint or chalk paint can conceal flaws and tie the base together visually.
- Decide whether to seal the wood based on how you’ll use the table: raw for a natural aesthetic, or sealed for easier cleaning and protection.
- Rotate heavy items occasionally to prevent uneven wear, just as we rotated the stump while it was on the towel.
This little project is a reminder that small, low-cost DIY updates—like attaching pre-bought legs and applying a quick coat of paint—can transform a found object into a useful, attractive piece of furniture. The stump table now sits comfortably in the living room, adding a bit of coastal character and a practical surface for everyday life.
Linking Up: Funky Junk, The Creative Collection, The Party Bunch, MMJ Link Party