
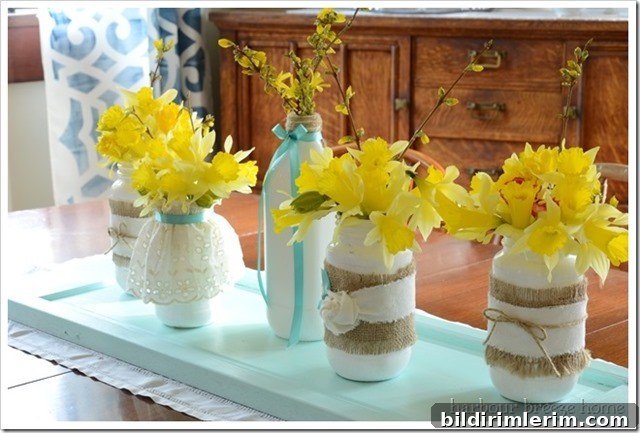
Creative Painted Centerpieces and Upcycled Decor
Have you ever had one of those weeks where your plans and to-do list were completely rearranged? That’s been my week—I meant to finish a stack of painting projects, but life had other ideas. I haven’t even had time to open the closet where I keep my brushes, yet inspiration is never far. When the paintbrush can’t get busy, I like to revisit favorite projects from the archive and share what makes them work.
Paint is such a powerful, affordable way to transform ordinary items into eye-catching centerpieces and home décor. Below I’m highlighting a few of my tried-and-true painted pieces, explaining what made each one sing and offering practical tips you can use on your own DIY projects.
Painted Jars
Plain white house paint can do wonders. I transformed a mix of mason jars and recycled spaghetti sauce jars into classic, simple vases by painting them a crisp white and adding texture with burlap, canvas, and ribbon. The result is a cohesive, budget-friendly centerpiece that works for tables, mantels, and everyday displays. For best results, clean jars thoroughly, scuff the surface lightly so the paint adheres, and apply two thin coats rather than one thick coat to avoid drips.
Painted Flower Box
An ordinary wooden box waiting to be discarded became a darling table accent. What started as a plain, slightly dated piece was brightened with paint, toned down in places with a dark wood stain, and finished with simple white lettering to give it a fresh personality. Using a small brush for the lettering and a rag for distressing adds handcrafted character without complex techniques. This is a great example of how combining stain and paint can preserve wood texture while updating the color palette.
Painted Cupboard Door Tray
A spare cupboard door was resurrected into a charming serving tray with a few coats of aqua-blue mis-tint house paint. The color adds a cheerful pop wherever it sits, whether used under vases, candles, or seasonal decor. Some people attach handles to each end to make it more functional as a tray—an easy upgrade if you want portability. Sealing painted wood with a clear coat helps protect the finish if you plan to use it frequently.
If you’re thinking of trying painted centerpieces or upcycling household items, here are some practical tips that make projects easier and more durable:
- Prep is everything: Clean surfaces, remove labels, and sand gloss finishes to help the paint adhere.
- Prime when needed: A quick coat of primer improves coverage, especially on dark or glossy surfaces.
- Use thin coats: Apply multiple thin coats rather than one thick coat to avoid drips and achieve a smoother finish.
- Mix textures: Combine paint with fabric, twine, burlap, or metal accents to create depth and interest.
- Seal the finish: For pieces that will be handled often or placed outdoors, use a clear sealer appropriate for the paint type.
- Personalize simply: Stencils, hand-painted lettering, or small decals can add a custom touch without complex skills.
One of the best parts of painting and upcycling is how forgiving the process can be. If you don’t love the first color, a new coat will fix it. If a decorative detail feels off, it can usually be sanded or painted over. These projects are about creativity and transformation—seeing potential in the ordinary and turning it into something that fits your style.
Have you used paint to breathe new life into simple objects? I’d love to hear what you’ve transformed and any tips you’ve learned along the way. Whether you’re refurbishing jars, reinventing wooden trays, or painting unexpected finds, small projects can make a big impact on your home’s look and feel.
Happy Painting!
Rita Joy