
DIY Washer Necklace: Metal Stamping and Wire-Wrapped Pendant
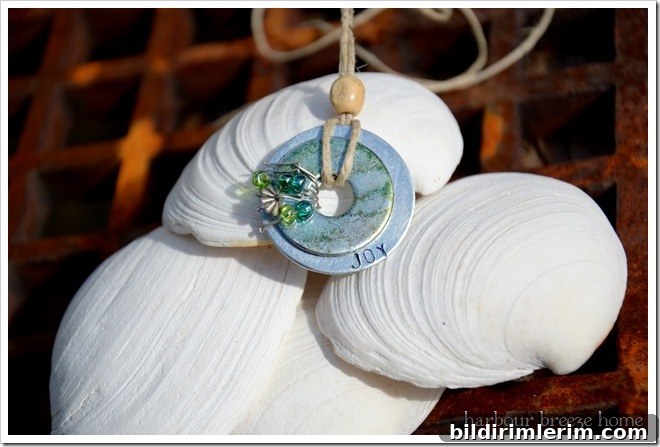
Create custom jewelry with a simple washer necklace using metal stamping, ink dying, and wire wrapping. This easy craft produces personalized pendants that work well for gifts, seasonal pieces, or everyday wear. In this guide I share the approach I developed after learning from friends and combining several techniques—metal stamping the washer, adding color with alcohol ink, and finishing the piece with wire wrapping and beads or simple hemp cord for the necklace.
My introduction to washer necklaces came from a friend, Kerry‑Lea, during a visit to Nebraska. While I was there I picked up a set of steel letter stamps—which caused a little embarrassment in the airport security line when they were inspected—but the stamps are worth it for the customized results.
Materials You’ll Need
- Flat metal washers (various sizes depending on your design)
- Steel letter and number stamps for metal stamping
- Hammer and sturdy surface (anvil or bench block)
- Alcohol inks or metal patina for coloring smaller washers
- Fine sandpaper, steel wool, or polishing cloth
- Thin gauge wire and seed beads for wrapping (optional)
- Hemp cord, ribbon, or chain for the necklace
- Pliers and wire cutters
- Protective eyewear and a stable workspace
Step-by-Step Overview
1. Clean and prepare each washer: Remove any oil or dirt so stamping and inks adhere properly. Use rubbing alcohol and dry thoroughly.
2. Stamp your message: Position the washer on a solid surface and center the stamp. Hold the stamp straight and strike firmly with a hammer. Repeat for each character, checking spacing as you go. Practice on scrap metal first to get comfortable with alignment and force.
3. Add color (optional): For a pop of color on smaller washers, use a drop of alcohol ink. Allow ink to penetrate briefly, then wipe away excess so the stamped letters remain visible. Experiment with layering colors or blending for unique effects. Let dry completely.
4. Wire wrap and add bead accents: Cut a length of thin wire and begin wrapping through the center of the washers, adding seed beads as desired. Secure the wire with tight loops and trim any excess. This creates a decorative border and helps hold layered washers together.
5. Attach the necklace: For a rustic look, use hemp cord and add a simple bead as a focal point. For a more polished finish, use satin ribbon or a metal chain. Fasten closures or tie knots that are secure and adjustable.
Finishing Touches and Care
Polish the metal with fine sandpaper or a cloth to highlight stamped letters and remove any rough edges. If you used ink or patina, consider sealing the surface with a clear sealant appropriate for metal and inks to protect the finish. Store your washer necklaces in a dry place and avoid exposure to harsh chemicals or prolonged moisture to preserve the color and metal.
Design Variations and Tips
- Try stacking two or three washers of different sizes for layered interest.
- Use alternating finishes—brushed for one washer, polished for another—for contrast.
- If you’re nervous about spacing letters, lightly mark guide points with a pencil or tape before stamping.
- Experiment with embossed symbols or simple shapes to pair with names or dates.
- Ribbon offers a softer, more elegant look; hemp cord gives a bohemian, casual feel.
This project is forgiving and highly customizable, making it ideal for beginners and experienced crafters alike. Combining stamping, inking, and wire work gives you many creative directions to explore, whether you’re making keepsakes or selling at craft fairs. Enjoy the process of personalizing each piece and experimenting with colors and textures until you find a signature look that suits your style.