Dress up your kitchen with simple, inexpensive above-the-stove wall art using free printable designs.
Easy Kitchen Wall Art Using Free Printables
After completing a small budget kitchen makeover, I wanted a finishing touch for the space above the stove. The area needed a pop of personality—something cheerful and inexpensive that would complement the existing colors and feel of the room. Free vintage-style printables provided the perfect solution and made the project fast, fun, and budget-friendly.
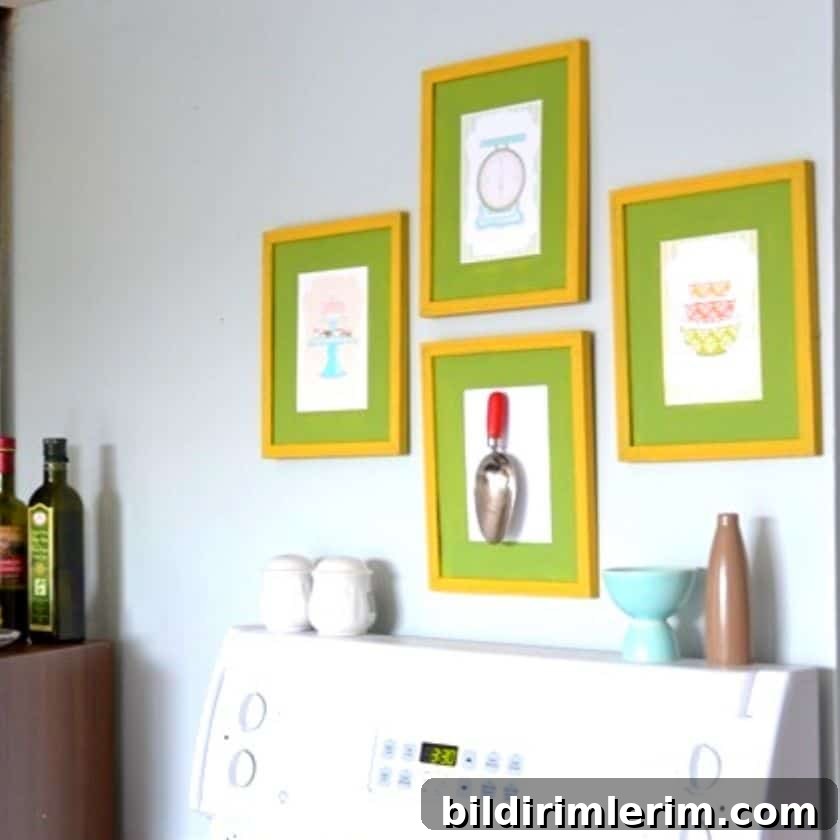
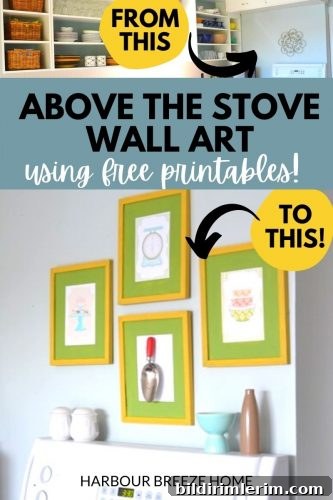
I found a set of three vintage kitchen printables from a blog I admire. The artwork has a nostalgic charm that suits a cozy kitchen, and it was easy to adapt the prints to fit my space. The final arrangement includes three framed prints plus a fourth frame that holds a small heirloom kitchen scoop, which adds texture and a personal touch.
Supplies You’ll Need for Above-the-Stove Wall Art
- Three free printable vintage kitchen images (printed on cardstock)
- Four picture frames sized to fit 8.5 x 11 prints
- Acrylic craft paint in a bright, happy color (I chose yellow)
- A small vintage kitchen tool, scoop, or utensil to display in one frame
- Cardstock for printing and basic hanging hardware
Step 1: Prepare the Frames
I began by selecting four simple black frames with white mats from a discount store. The mats looked slightly off against my wall color, so I tested painting them in a bright hue to make the prints pop. First I tried a green but later changed to a warm yellow that contrasted beautifully with the blue-gray wall in the kitchen.
Painting the mats and the inside edge of the frames refreshed the overall look and ensured the framed pieces read as a cohesive set. For the fourth frame, I placed an antique scoop in the center and secured it so it would hang flat and look intentional alongside the printed art.
Step 2: Print and Mount the Art
Print the selected images at full-size on sturdy cardstock to prevent warping in the frame. Trim as needed and place each print behind the painted mat. The thickness of the cardstock helps the print sit nicely and keeps the final piece looking professional even though it was created on a small budget.
If you don’t have cardstock or a home printer that handles heavier paper, a local print shop can print high-quality results at minimal cost. Mounting the art in frames with contrasting mats elevates the printables and creates a gallery-style display that suits many kitchen styles, from modern to farmhouse.
Arrange and Hang
Before putting nails in the wall, lay the frames on the counter or floor to decide the best spacing and alignment. I positioned the three prints horizontally above the stove and centered the fourth frame with the scoop beneath them so it felt balanced. Measuring carefully and using level hardware will keep the arrangement straight and symmetrical.
The painted yellow frames add a cheerful accent and draw the eye to the small gallery above the stove. The mix of printed artwork and a real vintage piece gives the display depth and personality without cluttering the space.
This DIY project demonstrates how free printables, inexpensive frames, and a little paint can transform a blank wall into an inviting focal point. It’s a fast, affordable way to introduce color, pattern, and charm to your kitchen—especially in areas like the backsplash or the space above the range where traditional decor options can be limited.
Give this idea a try: pick a color that complements your kitchen, use sturdy paper for printing, and include one sentimental or vintage item to make the arrangement uniquely yours. The result is a cheerful, curated gallery that refreshes the room without breaking the bank.