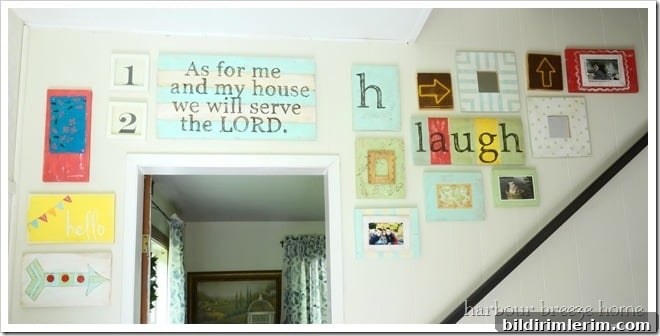
Entryway Gallery Wall: DIY Light Reflector Arrow Sign
Last Friday I shared our new entryway gallery wall, and one of the pieces I made for it was a fun, inexpensive Light Reflector Arrow Sign. A cluster of handmade wall art immediately brought life and personality to the space — and it cost me nothing to create, using reclaimed materials and a little creativity.
Finding Materials: Reclaimed Wood and a Little Inspiration
The project began at a local carpenter’s shop, where I was allowed to sift through off-cuts and scrap wood that would otherwise have been discarded. I left with a generous armful of varied boards — each with its own grain and character — and I knew I wanted to use them right away so the project wouldn’t turn into one more unfinished task around the house.
To shape the direction of my designs I turned to an inspirational resource I’d purchased months earlier: The Handmade Home’s Handmade Walls e-book. Studying that guide introduced me to a layered finish technique I hadn’t tried before — combining latex house paint with stain to develop subtle depth, texture and an aged look. Once I read the process and saw the examples, I was eager to experiment.
Choosing Colors and Working Efficiently
I pulled colors from my paint stash — I keep a wide selection for projects — and set an ambitious goal: paint every board in one day. I didn’t quite finish all of them in a single day, but I came close. Once I got started it was enjoyable to treat each board as a small canvas and try a different combination or technique on each piece.
One of my favorite outcomes from that day was the Light Reflector Arrow Sign. I’d found three vintage light reflectors at a garage sale for 50 cents and imagined they would make a great accent and functional peg for the arrow sign. Since our oldest son has loved bows and arrows from a very young age, an arrow motif felt perfectly at home.
Step-by-Step: How I Made the Light Reflector Arrow Sign
Here’s a clear, compact walkthrough of how the arrow sign came together.
1. Paint the edges. Start by painting the edges of the board in your intended top color — for my sign I used white. Doing the edges first gives a finished look from the side.
2. Apply the base coat with texture. Paint a base coat using up-and-down and side-to-side strokes to create visible texture. This layering helps the finish look handcrafted and tactile.
3. Speed drying when needed. If you want to move faster, a hair dryer will accelerate drying between coats — useful for impatient painters who want quick results.
4. Transfer the arrow outline. Transfer your arrow pattern to the board with graphite paper. I used a Google arrow image as a guide and modified it to suit my proportions.
5. Paint the arrow and create clean lines. For straight lines and stripes I used painter’s tape, removing the tape before the paint fully dried to avoid peeling. For smaller details, a fine brush works well.
6. Distress for an aged look. When the top coat was nearly dry, I used a paper towel to gently rub areas, revealing the base coat and producing a worn, distressed finish. This technique softens the precision of painted lines and adds character.
7. Add subtle layers with your hands. The author of the e-book encourages tapping and smearing small amounts of paint with your fingers to introduce subtle color variations and layers. It feels odd at first, but it quickly becomes intuitive and effective.
8. Outline and soften. I lightly traced the arrow with a fine brush in a loose, relaxed line to avoid a too-perfect, mechanical look.
9. Apply stain for depth and age. With a rag, I worked stain into the edges and dragged it toward the center, then wiped off excess until the finish felt aged and balanced. This step unifies the layers and adds warmth.
Attach the Reflectors
I cleaned the three garage-sale reflectors, drilled small holes at the centers of the arrow head and shaft sections, and fastened the reflectors in place so they sat securely. The reflectors function as decorative pegs and can also be used to hang lightweight items if desired.
Final Thoughts
Repurposing scrap wood and found items like garage-sale reflectors made this project both budget-friendly and uniquely personal. The layered paint-and-stain technique creates depth, while simple distressing and hand-applied details give each board character. Whether you display the arrow as a decorative accent or use the reflectors as practical pegs, the sign is a reminder that small reclaimed pieces can become distinctive, meaningful décor.
Many thanks to Ashley and Jamin for their Handmade Walls e-book, which sparked the techniques and ideas I used here. I received no compensation for this post.
Linking to a few creative communities and link parties that inspired my process and encouraged sharing: It’s So Very Cheri, Alderberry Hill, Mod Vintage Life, C.R.A.F.T., Home Stories A-Z, Today’s Creative Blog, Ladybug Blessings, and Coastal Charm.